Topic: Mosaics, Tessellations, Geometric figures
Area: Technology, Mathematics
Abstract: This proposal aims to work on tessellations through the work of the mathematical artist M. C. Escher. With it we will propose learning and exploring the possibilities offered by geometric figures to create singular, unique and very eye-catching works of art, as well as learning about their concepts. It is a learning proposal that can be applied in the second year of ESO and, as far as possible, two or three classes will be needed for it to be carried out. No previous knowledge is necessary, as it is designed to be applied as an initial activity or to introduce the subject.
Learning objectives:
- To know what tessellations are (Content of the Mathematical Area of the ESO Curriculum)
- To learn about the work developed by M. C. Escher in the field of art and mathematics. (Content of the Mathematical Area and Artistic Area of the ESO Curriculum)
- To know how to differentiate between regular, semi-regular and irregular tessellations based on the geometric figures that make them up. (Content of the Mathematical Area of the ESO Curriculum)
- To create tessellations using Escher’s techniques. (Content of the Mathematical Area of the ESO Curriculum)
- To create animated GIFS from tessellations. (Content of the Mathematical Area and Technology Area of the ESO Curriculum)
- Create a collaborative mosaic (Content of the Mathematical Area and Technology Area of the ESO Curriculum)
- Learn and work with others using cooperative learning strategies.
Teachers’ profile: (team transversality): Mathematics, Arts, Technology
Advisable age of students: 2nd ESO (12-13-14 years) (Flexible according to the curriculum of specific country) . Attention to diversity and inclusion aspects to have in account:
Previous knowledge:
-Previous knowledge about geometric figures
-Previous knowledge about teamwork
-Digital skills and competences
Global development
Total duration: 4 hours
Materials:
- Images of Tessellations
- Images of Tessellation of Escher and geometric figures
- Webs and Apps to create and share a Gift
- Web to create a Collage
- Web to create a word cloud art
- A4 white paper
- Projector
- PC
Phase 1 Duration: 45 min Visualisation
Development
In this first phase of the learning proposal, before starting, the students will be asked if they know what tessellations are. Depending on the answers, a small initial debate can be started through their previous knowledge that serves to activate that same knowledge for those who already have it, and for those who do not, to begin to connect with the content that is going to be worked on. From here, different tessellations (1) from different periods and authors, recognized and not, among them and above all by M. C. Escher will be shown through the projector in the classroom. Based on the examples shown, the following questions will be asked:
– What do you see in the pictures?
– Do you know where we can find similar shapes and mosaics in our environment? From this question, if possible, you can observe the floor of the classroom, or go out into the playground or outside the school to recognize that in our architecture and especially in the floors of our streets and buildings, we are full of these pieces. As we are making the observation, we can accompany it with the following questions:
– Which shapes can you recognize?
– Are they geometrical figures?
– Are they all the same?
– What catches your attention?
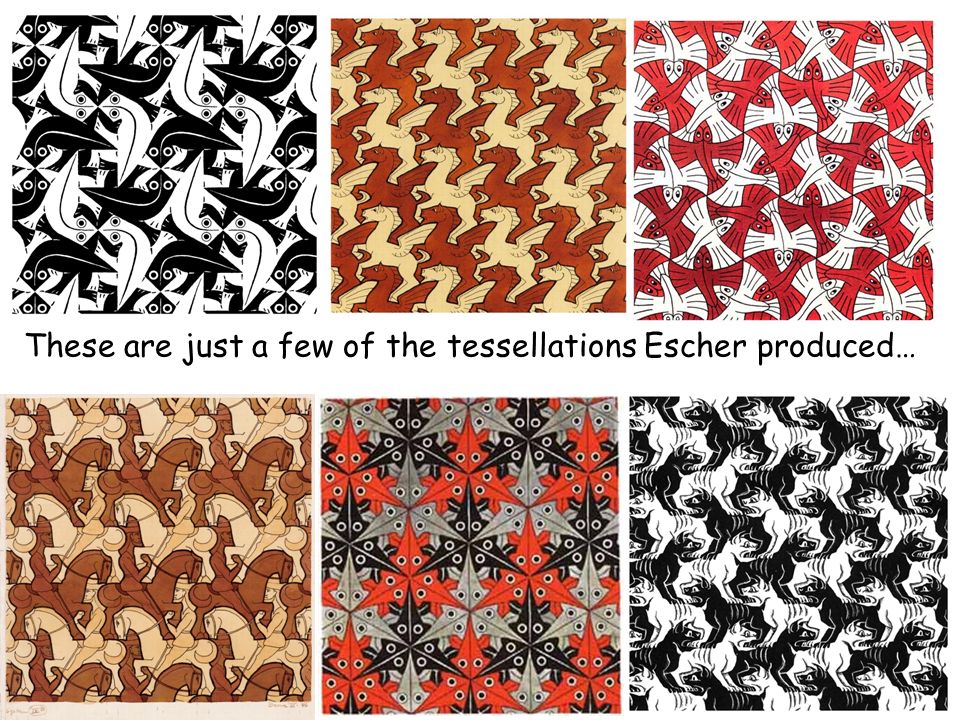
Among other questions that may arise from the same group. After this first observation and introduction to tessellations, different images of M. C. Escher are projected with four objectives. The first is to get to know the author and his work as a mathematical artist. The second is to learn about the types of tessellations that exist depending on what the geometric figures are like, i.e. whether they are regular or irregular. The third is how tessellations are constructed and how they are best constructed using regular geometric figures. In this case, examples will be shown so that students can identify different geometric figures in different tessellations that will help them to see how they are created (2). The fourth and last objective is to present examples of tessellations in GIFS format so that students can see both the technology, and to present what GIFS are for those who do not know, and to introduce the next phase, there are some examples of GIFS (3).
Phase 2 Duration: 2:30 hours Artistic action and experimentation
Development:
Creating tessellations through the cooperative learning strategy 1, 2, 4
In the second phase and after visualizing the examples of the previous phase and understanding how tessellations are constructed from geometric figures as M. C. Escher did, the following activity based on a cooperative learning strategy called 1, 2, 4 will be presented.
First, each student will draw a geometric figure on a blank sheet of paper and will try to create from it a type of tessellation according to their own taste and taking into account the technique used by Escher. This will take about 10 minutes, as it has to be brief.
In a second moment, and after the individual proposal, each student will share his/her creation with the person next to him/her, with the aim of creating a new one following the same criteria as Escher did. Most probably, the tessellation will now be irregular with respect to the geometric figures. They will have 20 minutes to do this, as it does not have to be perfect and should be used to start experimenting with creative possibilities.
Finally, each pair will get together with another pair and the same dynamic will be carried out. The two creations will be shared with the aim of connecting two different tessellations and creating a new one between the 4 of them. The group of 4 will have 30 minutes to do this. Once the creations have been made, they will move on to the next activity. (1h total)
Creation of a group GIF of each tessellation created.
Once each group has created their own tessellation, they have the challenge of transforming what they have drawn on paper into an animated GIF. To do this, they can use different tools such as Canva or others to do so (4). Once each group has created its own GIF, a mosaic/collage of all the class creations will be created as an example of collaborative artwork with Befunky.com (5). (1:30 h total)
Phase 3: Duration: 30 – 45 minutes Reflexion and debate
Development: In the third phase, we will start by visualising the mosaic created by the whole group and each individual student will share a word or short phrase suggested by the creation. All the words will be collected by the teacher through the Wordart.com tool (6), and in this way a word cloud will be generated. Using the cloud and visualising the words, the teacher will begin to reflect on the experience of each individual student and how each group has arrived at its creation, focusing on the creative process and the construction of the tessellation, up to the experience of creating the GIFT, etc. It will be very important that each student is able to express how they have felt throughout the process. Finally, and to close the process, a sentence will be asked to describe the group’s experience, which will also be collected with the Wordart tool.
Comments, possible derivations, and prolongations of the proposal:
- Phase 1 – Getting to know the environment
In the first phase, and depending on the time, when we go out into the environment, we can take photographs of the tessellations we can find and then share the images and discuss or reflect on them. It is a way of getting to know the environment through the eyes of art and the mathematics that surround us in our lives without us being aware of it. It is also a way of learning more about the type of geometric figures that exist, whether they are regular or irregular, and for pupils to identify and describe what they have photographed with their own Smartphone.
- Phase – 2 – Body experimentation of each group creation
Once each group has created their own tessellation proposal and their own GIF, each group should create a short theatrical performance explaining the story and message behind each animated creation. For example, they will have to represent the movements they have made with the geometric figures to create the tessellation, imagining that each of them is a geometric figure. This part will work on free interpretation.
References and links:
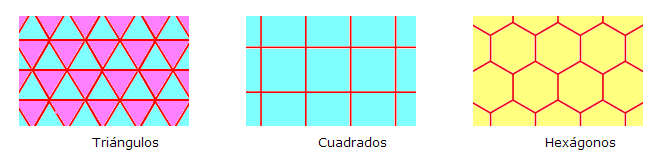
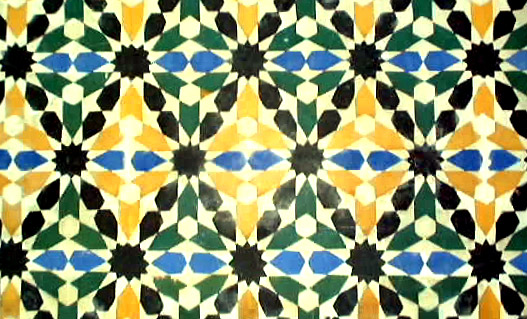
- (1) Images of Tessellations
https://www.youtube.com/watch?v=njp6yexWbfw(Escher)
https://matematica.laguia2000.com/wp-content/uploads/2013/03/2.png (Regulars)
https://matematica.laguia2000.com/wp-content/uploads/2013/03/3.png (Semi Regulars)
https://www.lifeder.com/wp-content/uploads/2020/03/Mosaico_alhambra2.jpg (Irregular)
- (2) Images of Tessellation of Escher and geometric figures
IMAGE
- (3) GIFS Escher
https://giphy.com/gifs/wolfram-research-escher-mc-wolflang-26BRBJa6iqmkfAIes
https://giphy.com/gifs/europeana-fish-3oz8xT8rtdvyK13nuE
- (4) Webs and Apps to create and share a Gift:
https://www.kizoa.es/GIF-animado
https://gifs.com/
https://giphy.com/
https://www.canva.com/es_es/crear/gif/ - (5) Web to create a Collage https://www.befunky.com/es/opciones/collage-de-fotos/
- (6) Web to create a word cloud art https://wordart.com/
- Web about Maths and Tessellation: https://mathworld.wolfram.com/Tessellation.html
- Webs Escher: https://mcescher.com/
https://www.wikiart.org/es/m-c-escher